Running a cheaper Spot Instance

Spot instances can make running a website really, really cheap. In my experience, though, it hasn’t been as cheap as I had hoped. So I re-created this site using a t2.micro EC2 instance which is supposed to run at less than $0.01 an hour.

Of course, as the site runs, it needs a static IPv4 address which adds an additional half a cent cost. This isn’t super expensive, mind you, but it adds up.

Azure training – Prologue

I’ve decided to get into Azure and get some certifications to make myself a more viable candidate for future positions. Personally I like AWS much better than Azure, but since most businesses use Microsoft learning Azure is pretty much mandatory for cloud computing enthusiasts.

So – we’re back – with a NEW spot instance!

Okay, I haven’t posted for a few months YEARS now – sorry!

I had been running this site on a (very) basic EC2 spot instance for a while, then I found out last month that the bid price was too low and it wouldn’t start. For some reason, AWS doesn’t let you just change the bid price – you have to create an entirely new spot instance.  This isn’t that hard but if you haven’t done it for 4+ years, it’s a bit of a challenge.

Luckily I managed to get it all up and running, but it took looking at an AWS guide to get it to work.

What is with Webadmins in Japan?

Okay, this is just one example but I’ve seen this happen dozens (maybe hundreds) of times in Japan and I can’t figure out why. For some reason when a website has the prepended “www” in the FQDN, you MUST include the www when you enter the URL or it won’t work. This is really clumsy because it only takes a small tweak in your web server settings to automatically prepend the “www” to make the site launch properly.

I just heard about a great Python lab and the URL was www.startlab.media. Since virtually every site will prepend the “www”, I entered the root domain name, and this is what I got:

Nice to see they’re running nginix. So on the next run I prepended the “www” and the site loaded properly:

Ah, that’s more like it! Mind you, this is a minor point, but it’s a pretty basic one. I’m not quite sure why web admins in Japan consistently overlook this but I can’t tell you how many times I’ve run into this.

Using Python for a redundant directory listing

A client asked me about help on a Python script. I jumped into my seat and excited typed “OF COURSE!!”, more excited than Dug getting to play fetch.

She was using Python to run a DOS command. This isn’t a horrible way to do things, actually, it is a horrible way to do things so I tried to ween her off this and use a more Pythonic way of doing it. (Okay, full disclosure, I use this for my scripts so they stay live after they’re finished:)

os.system("pause")

I didn’t get the entire code, but this was what she eventually came up with that worked:

subprocess.call(["dir"+"/O:-D/A:-D",bookingFilePath1, ">>","tmp2.txt"], shell=True )

It’s cool that she’s using the subprocess but this isn’t the “Python” way of doing things. At the very least, if you get the result you need without a bug then that should suffice. But being a Pythonista means delving deeper until you come up with the most Python-like solution.

What I came up with is the following, which worked perfectly and is mostly Pythonic:

import os

targpath = "C:\\users\\ReedActed\\desktop\\" # To direct location of target file

with open(targpath + 'P-drive-test.txt', 'w', encoding='utf-8') as outfile:
  for r, d, f in os.walk('P:\\backup\\'):
    for file in f:
     fileneat = os.path.join(r, file) + "\n"
     outfile.write(fileneat)

Regrettably, she found out what her error was and continued to use the DOS command in Python rather than use Python’s native libraries. *SIGH*

Site down Uh-GAIN! – SOLVED

Okay, so after checking the site, I noticed it was down AGAIN. Cause? That pesky DNS issue. For some odd reason, this website’s IP address keeps changing even though I didn’t restart it.

Solution? Add an Elastic IP address. This will keep DNS consistent, and so far, it keeps working. I won’t use an elastic load balancer as I was trained for because it incurs too much of a monthly cost. But I may do that just for testing if it becomes necessary.

VM Ware server set up at my previous employer’s office

I’m writing this from memory so some of the details might be sketchy.

At my last employer in Japan (the place where I took the intro photograph to this site), I was tasked with setting up a basic server to run MySQL. The TL;DR version was that there was a Windows 7 PC that was running MySQL that had data from which reports on Japan’s biggest convenience store chain were run. If this Win 7 PC failed the data would be lost, plus the “server” was underpowered. There was a proposal from a vendor for several thousands of dollars to set up a new server, a new UPS and backup system.

Since we had a second physical server which was not even set up and it was already on the UPS, it seemed foolish to me to purchase and install another one for a PC running MySQL, particularly when it was only being used once a week. I had to set up the disk array, install ESXi, install Linux as one VM, and create a backup routine to our file server which got backed up nightly off site.

Step 1: Set up the disk array

RAID 10 is all the rage these days, but this server wasn’t spec’d for that, so I figured RAID 5 would be the best choice. This server had 4 1.8 TB disks so with RAID 5 we’d have 5.1 TB of storage which was MORE than we’d ever need (the MySQL database was about 10 GB after 7 years, so even 500 GB of total space for this server would be fine).

After fixing a boot issue (one of the engineers tried setting up this server earlier but he didn’t understand what UEFI is and he couldn’t get the server to boot into Linux via a USB drive), I went into the controller to set up RAID. Using the controller, I set up a RAID 5 array:

RAID setup

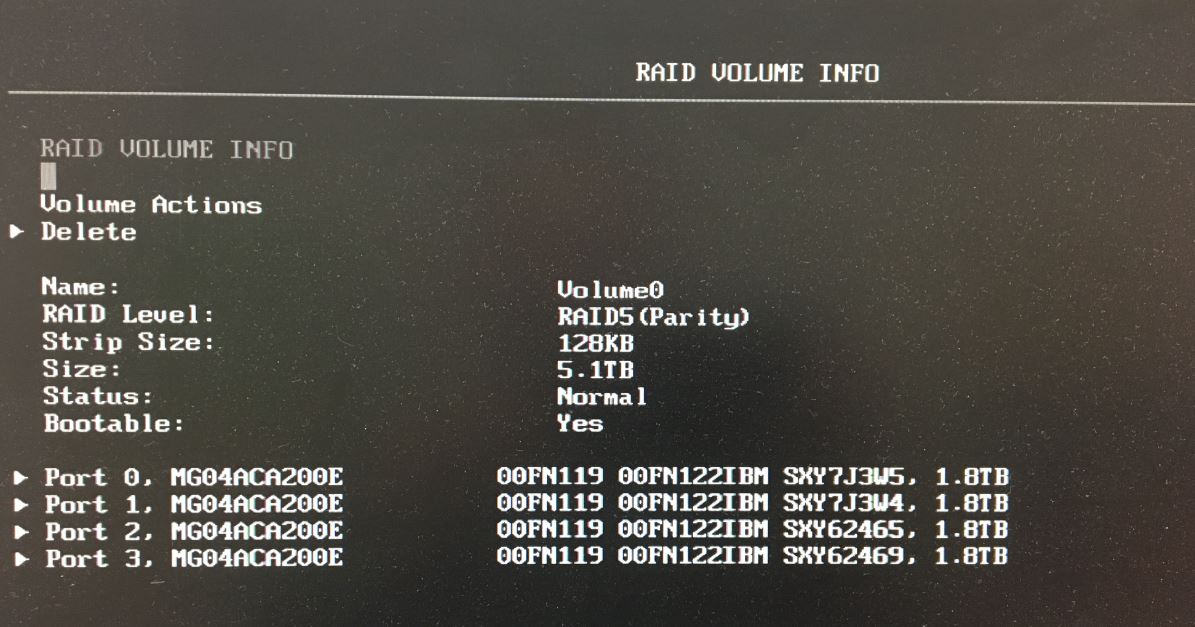
Great, all set. Now reboot and let’s run ESXi setup. I’ll select the disk volume and get going.

Step 2: install ESXi manager

ESXi installer

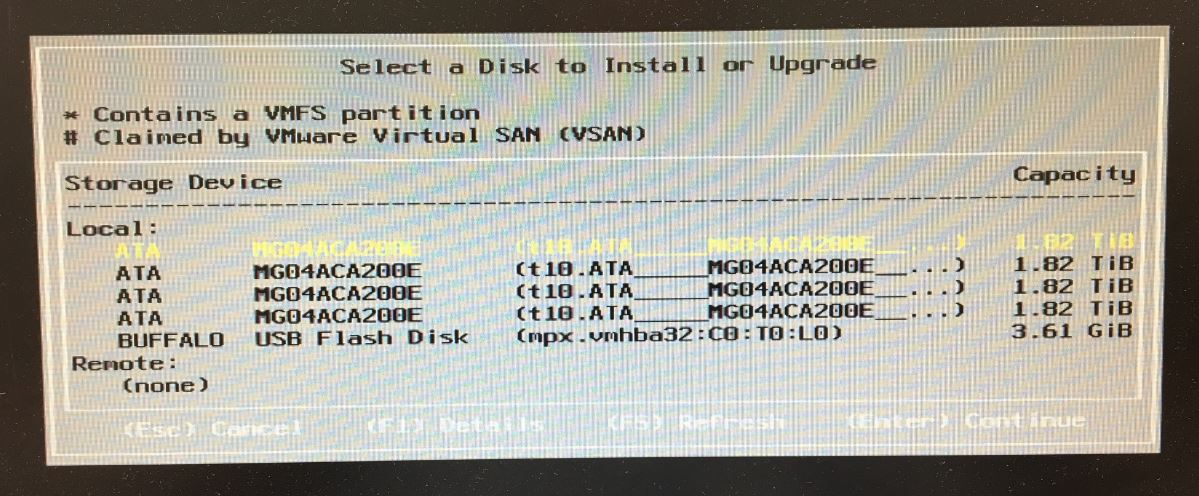
Hmmm…no array, it only sees the individual disks. Something doesn’t look right here.  Long story short, after going back into the controller setup, RAID 5 was no longer set up and it only had individual disks again. After running around with this after several passes, I searched for help on the Lenovo forums. First thing was I booted onto a Linux boot disk and check the hardware. I needed which controller was being used, and found this:

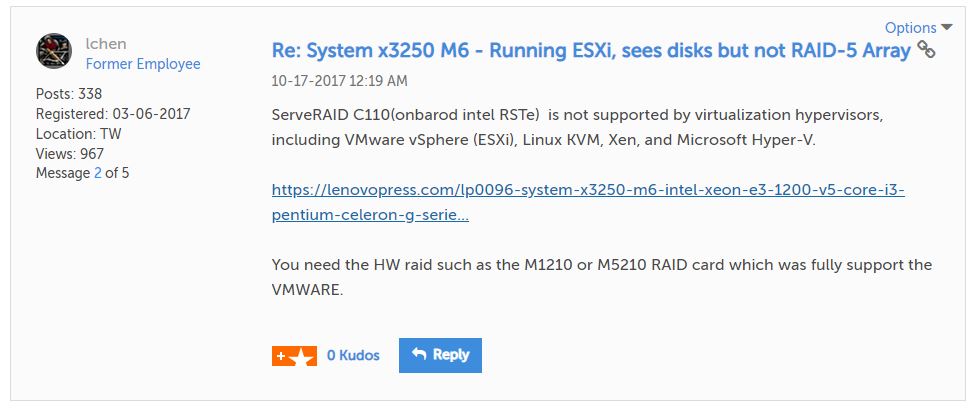
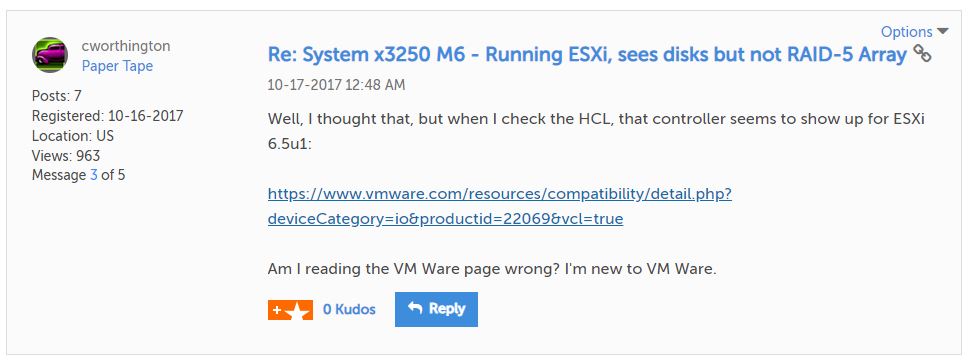
I looked up this controller on the hardware compatibility list (HCL) for VMWare, so I’m stumped. Time to turn to the Lenovo forums. This is a reply I got:

(thread is short but can be found here)

But since I checked the hardware compatibility list, it showed this controller as being compatible. I had to reply:


Regrettably, I was still going to be sunk:

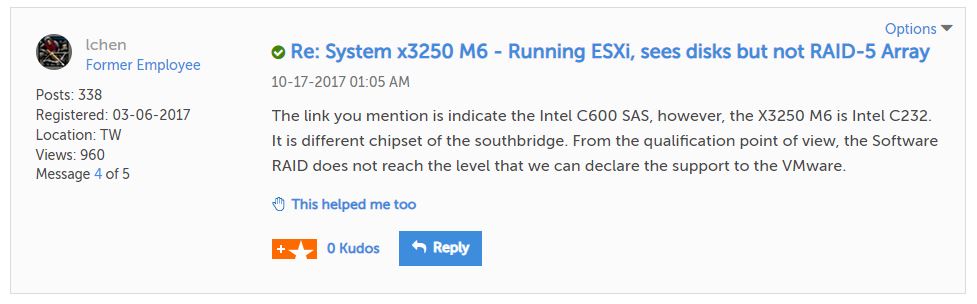
According to Lenovo support apparently this server’s controller won’t support RAID arrays with ESXi and will require an expensive upgrade.  Ugh.

So skipping straight to the solution:

I had to set up 4 individual disks, with the last one serving as a backup for the virtual machines on the other 3 disks. Since the backup volume ALSO maxed out at 1.8 TB, I made sure the other 3 disks were only 600 GB or less so they could back up to the fourth disk. I also ensured that the MySQL database was backed up to another file server so in case the database became corrupted it was backed up.

So final tally:

3 VMs x 600 GB -> Backed up to 1.8 TB volume (which itself was backed up once every 3 months). The remaining 1.2 TB per volume would be unused at the moment.

1 MySQL database (roughly 10 GB) backed up to a file server once a week (it was only used once a week)

Each of the backups listed above was backed up to our file server, which was backed up nightly offsite.

This solution wasn’t ideal but it would work.

Server down – PANIC!!!

I thought I would look at my website since I view it so seldom, and lo and behold, IT’S DOWN!!!

PANIC!

First I tried restarting the AWS EC2 instance – NO SITE!

PANIC!

Next, I tried to SSH in, but the IP address has changed since i rebooted.

forehead slap

Got the new IP, started SSH, got in. httpd and mysqld aren’t running (Dufuq?)

Tried restarting them  but couldn’t!!!  Have I been hacked?

After I calmed down, I saw that I needed to sudo.

Silly me!

Once I did that, I was able to restart httpd and mysqld

Phew!

But now I can’t see the site in my browser. Clearly this is a Route 53 / DNS issue.

Updated DNS entry with new, correct IP address. Now comes the waiting game, as pinging the domain name reveals the old IP address:

First ping test failed

(My OS is in Japanese. Trust me, the pings were timing out).

After a few minutes, the IP address is correct and the site comes up:

Site's up!

Phew! It’s nice that the right IP address shows up, but I can’t test because it’s not responding to pings:

Ping test 2 success, but no reply

I decided to add a security policy so I can ping just for testing.

Instead of adding it to the main policy, I’m going to do the “Photoshop layer” thing and create a new policy that I can add/remove at will and apply it to the same EC2 instance.

I created a Echo reply rule and allowed it from anywhere (this is for testing).

Custom rules for ping

Okay, it’s set for both incoming and outgoing. Great! Let’s test it:

Ping Still failing

Hmmm. Failure.  Oh,  snap! I need to set the instance itself to allow pings. Duh!

I had to look it up, but I found the iptables command that would work best. I normally wouldn’t set this to respond to pings from everywhere but this is for testing.

iptables to the rescue!

Okay, the security policy is in place, the DNS entry is correct and the iptables/local firewall is set. Let’s test again:

Ping success!!

Success!! I can rest easy now. And since the ping policy is separate from the main security policy, I can turn it off/on at will, or delete it outright.

I love AWS!!